Launching Campaigns
Learn how to configure and launch AI-powered email campaigns to multiple recipients
🚀 Launching Your Campaign: Sending Personalized Emails
You have selected your targets. Now, let's unleash the AI to write and send personalized emails to all of them at once.
This feature allows you to send mass personalized emails where each message is uniquely crafted for the recipient, making every email look hand-written.
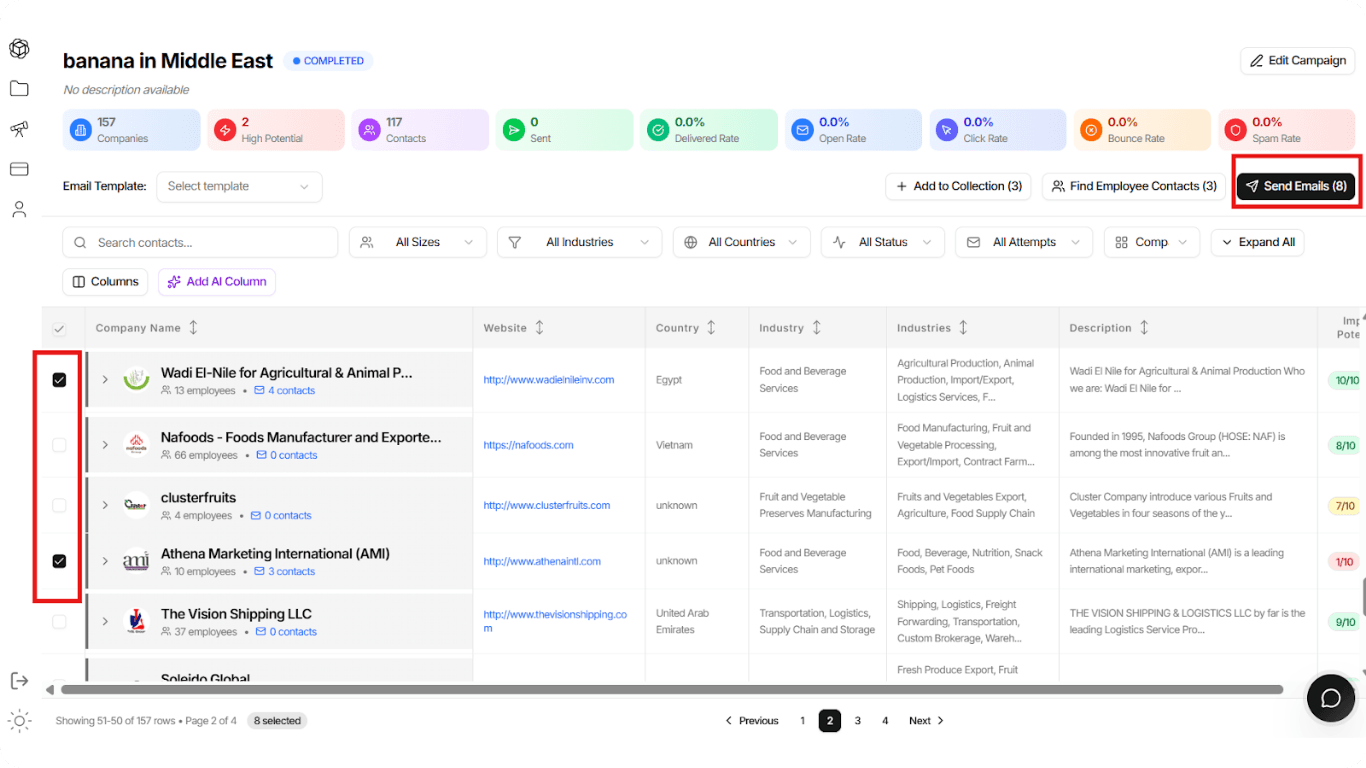
Step 1: Select Your Targets
Navigation: Stay in the Lead Analysis view (inside your Collection).
Checkbox Selection: Click the checkboxes on the left side of the companies you want to contact. You can:
- Select specific rows, or
- Use "Select All" for bulk selection
Trigger the Blast: Click the Send Emails button in the top right corner. The button will indicate how many recipients are queued (e.g., "Send Emails (8)").
You can select individual companies or use bulk selection to target multiple leads at once.
Step 2: Configure the AI Campaign
A popup window titled Send Campaign Emails will appear. This is where you give the AI its final marching orders.
1. Campaign Settings (Context)
Tell the AI what "hat" it should wear for this specific batch:
Business Type: Confirm if you are acting as an Exporter or Importer.
Product: Select the specific product you are selling (e.g., "Banana") from the dropdown. This pulls the USPs from the Product Profile you created earlier.
Tone & Style: Choose how you want to sound:
- Professional & Formal
- Friendly
- Urgent
💡 Pro Tip
The tone you select will influence how the AI adapts your message. Professional works best for B2B, while Friendly can be effective for smaller businesses.
2. Content Strategy
Email Template: Select one of your saved templates from the dropdown, or choose "Create from scratch".
Custom Instructions: If creating from scratch, type a prompt for the AI.
Example:
Help me create an email to introduce my company and ask for a meeting next week.You can combine a saved template with custom instructions to fine-tune the AI's output.

Step 3: Enable Tracking
⚠️ Crucial Step
Locate the Email Tracking & Options section at the bottom left.
Toggle "Email Tracking" ON: This ensures the system will monitor:
- Open Rates: Who opened your emails
- Click Rates: Who clicked links in your emails
- Bounce Rates: Which emails failed to deliver
Without this enabled, you won't know if your leads are reading your emails! Always keep tracking ON to measure campaign performance.
Step 4: Preview & Launch
You are not sending blind!
Generate Preview
Click the Create Preview button.
The AI Magic: The system will now generate a unique email for each selected recipient. It combines:
- Your Input: (Product USPs, Template)
- Their Data: (Recipient Name, Company Industry)
Review
Scroll through the previews to ensure the personalization looks natural.
Send
If you are satisfied, hit Send.
🎉 Congratulations!
You have just launched a mass outreach campaign where every single email looks like it was written by hand.